
Frequently asked questions
Answers about purchasing, installing and using PalmOrder.
Purchasing and pricing+
01How can I purchase PalmOrder?#+
Email us at office@palmorder.com — we will issue an invoice or refer you to a partner if one is available in your region.
02How many licenses do we need to buy?#+
The number of licenses depends on the number of mobile devices: 1 mobile device with PalmOrder =1 license. You cannot buy one license and use it on several devices. </p
03How much does implementation cost?#+
The cost of implementation of PalmOrder:Pre-Selling is determined by the firm that supports your accounting system. The cost depends on the number of mobile devices, the configuration complexity of PalmOrder, and an office accounting system, as well as on many other factors. When we implement PalmOrder to the accounting system we calculate the total price of implementation according to the current value of an operating hour of our specialists multiplied by the number of hours.
Our implementation price is $20 per hour. Usually the whole process takes 5-10 hours. The hot line via skype or e-mail is free.
04How much does support cost?#+
We never charge for:
- correcting program mistakes and fixing bugs;
- updates of a current version;
- hot-line support via e-mail or skype.
Paid services include:
- visiting customers' offices by our specialists;
- program modifications. We can further develop PalmOrder in a way to satisfy your needs and fit your business processes. Such improvements are not included in the license price and are determined according to the current value of an operating hour of our specialists multiplied by the number of hours spent.
Currently the rate is $20 per hour.
The firm that supports your accounting system is free to determine the cost of its service.
Server and data exchange+
01Як перейти з PalmOrder Server 6.x на PalmOrder Server 7.x?#+
- Створіть резервну копію сервера 6.x: збережіть
palmserv.ini,exchange.xml, файл ліцензії, текиinboxіoutboxта інші файли інтеграції. Не видаляйте цю копію, доки перехід не буде повністю перевірено. - Запросіть ліцензію для сервера 7.x, написавши на office@palmorder.com.
- Встановіть PalmOrder Server 7.x в окрему теку за інструкцією зі встановлення. Налаштуйте пароль адміністратора та нові теки
inboxіoutbox. Не запускайте його на тому самому порту, доки сервер 6.x ще працює. - Зупиніть сервер 6.x. Якщо він запущений як програма, закрийте
palm_server.exe. Якщо сервер працює як служба Windows, відкрийтеservices.mscі зупиніть службу «PalmOrder Server». Потім відкрийте командний рядок від імені адміністратора в теці сервера 6.x та виконайтеpalm_server.exe -delete. Переконайтеся, що службу видалено, а процесpalm_server.exeне працює. - Запустіть PalmOrder Server 7.x, виконайте перший запуск і активуйте отриману ліцензію. У журналі сервера не повинно бути помилок запуску.
- Скопіюйте
exchange.xmlзі старої текиoutboxу нову. Налаштуйте облікову систему так, щоб вона вивантажувала дані в нову текуoutboxі завантажувала документи з нової текиinbox. - На першому Android-пристрої відкрийте «Налаштування» → «Обмін» → «Сервер PalmOrder», увімкніть «Сервер версії 7+» і вкажіть адресу та порт PalmOrder Server 7.x.
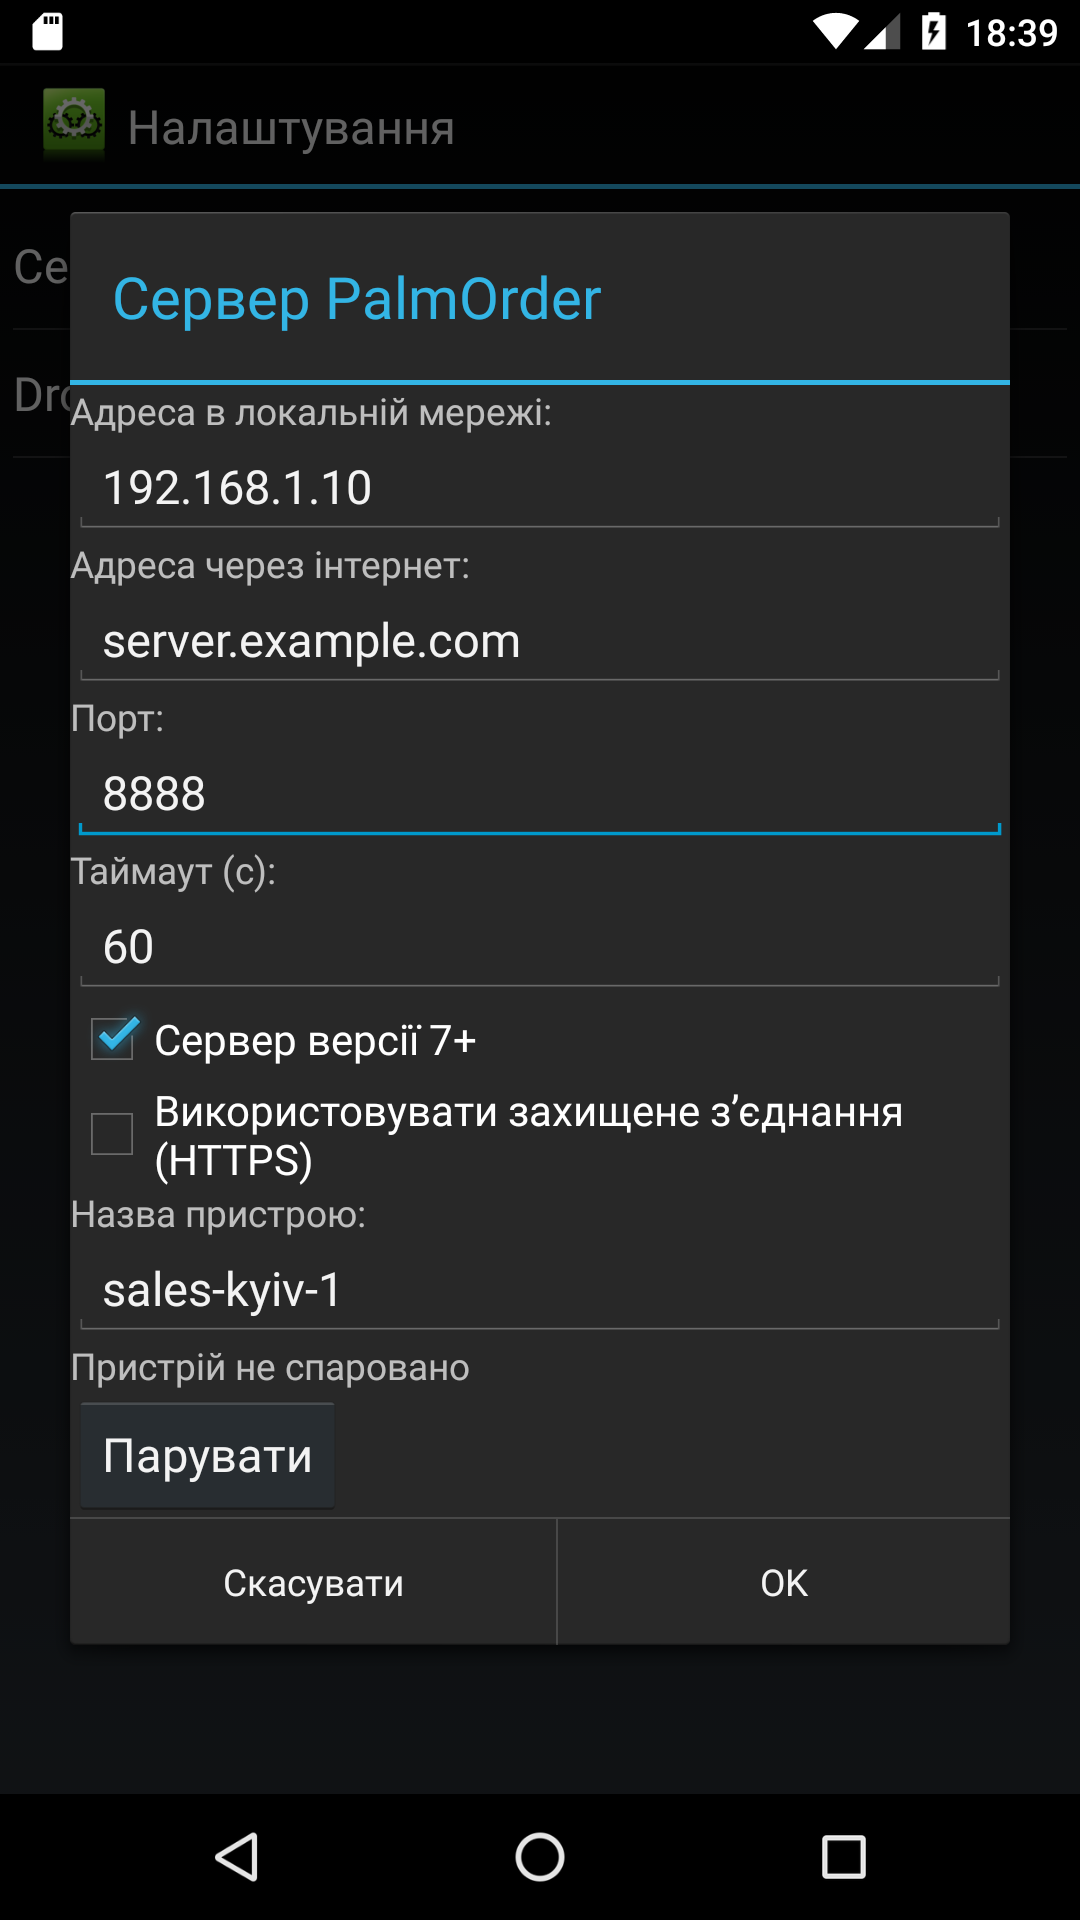
- Виконайте парування першого пристрою. Під час схвалення задайте унікальний
syncName. - Запустіть обмін на спарованому пристрої та перевірте результат у журналі сервера. Якщо дані завантажилися, а документи з’являються в новій теці
inbox, спаровуйте решту пристроїв по черзі.
02What if I don't have a static IP-address?#+
To perform the exchange, a computer with the installed server package should always be accessible from the Internet. Thus, it should have a static IP-address. But very often getting it can be quite costly. To solve this problem, you can use the service of assigning a permanent domain name to a dynamic IP-address.
This service is provided for free, for example, by the company «FreeDNS». All necessary information can be found on their website.
In this case you will need to indicate your registered domain name on the terminal in the exchange application, the «Address» field of Remote exchange.
03Xml2Eldb errors: causes and solutions#+
xml2eldb result | Cause | Solution |
|---|---|---|
Parse result code: <number_other_than_null> | XML-file contains syntax errors | Correct syntax errors in an XML-file. To find errors, use a browser (e.g. Mozilla Firefox): a browser indicates errors when a file is opened. |
XML validation error: <f> tag count does not confirm to table schema | Number of tags <f> inside <record> does not correspond to schema | |
XML validation error: field | One of the fields in a table is described incorrectly | «name» or «view» attribute of the tag <field> is not described, or is an empty string. |
Parse result code: 00000000. Table is empty | When converting, there are errors with adding records | Run xml2eldb with -d option. A detailed information about adding each entry will be displayed, so you can easily find an error. |
Mobile application+
01How do I prevent former employees from accessing the database?#+
If your mobile employee resigned or was fired, and you didn't delete the license from their PDA, they can continue receiving data from your server. To prevent it:
- be sure that you use PalmServer 6.1.0 or higher. Upgrade if not.
- be sure you use «PalmOrder: Pre-Selling» v.1.1.6 or higher. Upgrade if not.
- Install the user license (file LiteERP.license) on a new PDA. The exchange for an «older» PDA will be denied.
02How to create a route?#+
This feature is available for customers that use Full license
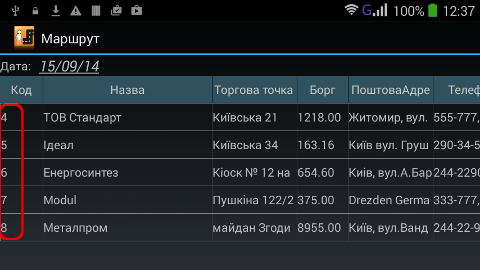
Create the file routes.xml manually, or using the integrated program modules in your AIS (ERP). Convert it into a db format using xml2eldb.exe. Here's the example of a route for the third day of the week (Wednesday), where you need to visit a customer with code 4 (point of sale code is 5010), a customer with code 5 (point of sale code is 5040), a customer with code 6 (point of sale code is 5050), a customer with code 7 (point of sale code is 5060), and a customer with code 8 (point of sale code is 110):
<?xml version="1.0" encoding="windows-1251"?>
<table name="routes">
  <schema>
    <field name="customer_code" type="TEXT" />
    <field name="week_day" type="INTEGER KEY" />
    <field name="trade_point_value" type="TEXT" />
  </schema>
  <data>
    <record>
      <f>4</f>
      <f>3</f>
      <f>5010</f>
    </record>
    <record>
      <f>5</f>
      <f>3</f>
      <f>5040</f>
    </record>
    <record>
      <f>6</f>
      <f>3</f>
      <f>5050</f>
    </record>
    <record>
      <f>7</f>
      <f>3</f>
      <f>5060</f>
    </record>
    <record>
      <f>8</f>
      <f>3</f>
      <f>110</f>
    </record>
  </data>
</table>
The point of sale codes are downloaded from AIS (ERP) into the file vl_trade_points.xml.
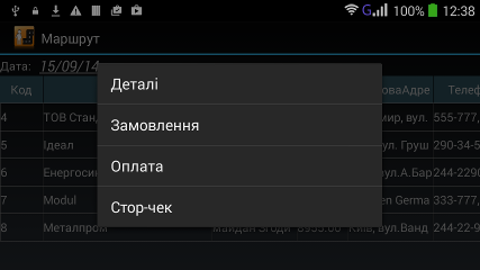
Instead of the field «week_day» (1 means Monday, 2 - Tuesday,... 7 - Sunday), you can use the field «date» as a specific date in the format YYYY-MM-DD. For example, 2014-08-21 means the 21st of August, 2014. When a route is uploaded on your PDA, you can enter it, choose a desired date, and you'll get a list of customers you need to visit on a particular day. Besides, you can create the «Request», «Payment» or «Store-Check» documents right here using a context menu (long tap a customer). Note, that you can not use both formats simultaneously.
Short tap on the customer will place it onto the Desktop.
03How to create and download a custom table#+
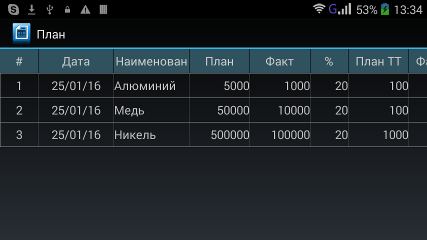
Starting with version 1.1.26, the users that own Full and Medium licenses of PalmOrder:Pre-selling can create and download the tables for arbitrary data on their mobile devices. To use this feature, perform the following steps:
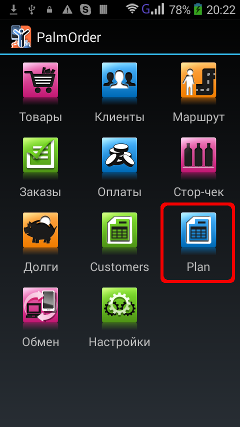
- Create a table in an XML format. The example of custom table. The structure of a custom table is formed according to the rules described in the Administrator's Guide chapter "The Format of Data Downloaded from ERP (References, Lists, Documents)". You also need to create a file with the column settings for a tabular section as described in the Administrator's Guide chapter "File with the remote settings for the table columns".
- Convert it into a DB format using the Xml2Eldb.exe utility.
- create the custom_tables.xml file as described in the Administrator's Guide (see chapter "Database" paragraph "Custom Tables"). The example.
- Edit your exchange.xml as described in the Administrator's Guide (see chapter "Database" paragraph "Custom Tables and File with the Remote Settings for the Table Columns").
- Place the listed files into the Outbox folder.
- Download the new file of exchange.
- Download the created XML-file of custom table(s), custom_tables.xml and column_settings.xml.
04How can I use Dropbox service for data exchange#+
To configure exchange via Dropbox do as follows:
- Get e-mail addresses for each mobile device (license) and one more for server (note, that you can use existing e-mail addresses).
- Use these addresses to register the Dropbox accounts (also for each mobile device and one more for server).
- Install dropbox.exe on your server PC. Create the synchronization folder in the root of C: drive, for example, C:\Dropbox.
- Copy C:\PalmOrder\Server to C:\Dropbox\Server.
- Enter your Dropbox server account and share folder named Server for other accounts, that are uses by mobile devices. Accept an invitation in every account (enter every account consequentially and click on Apply button, that appears).
- Correct paths in palmserv.ini: The paths must be relative. It means, that if you shared the folder named Server in previous point and folders Inbox and Outbox are inside it, your paths look like this: inbox=.\Inbox outbox=.\Outbox If every device (license) has its own Inbox and Outbox folders, for example, the device SA001 downloads data from …\Server\Outbox\SA001, and uploads data to …\Server\Inbox\SA001, then in section [SA001] of palmserv.ini you should enter outbox=.\Outbox\SA001 inbox=.\Inbox\SA001
Paths of Temp, Downloaded and Error folders leave as they are. No need to place them in Dropbox folder.
On every mobile device:
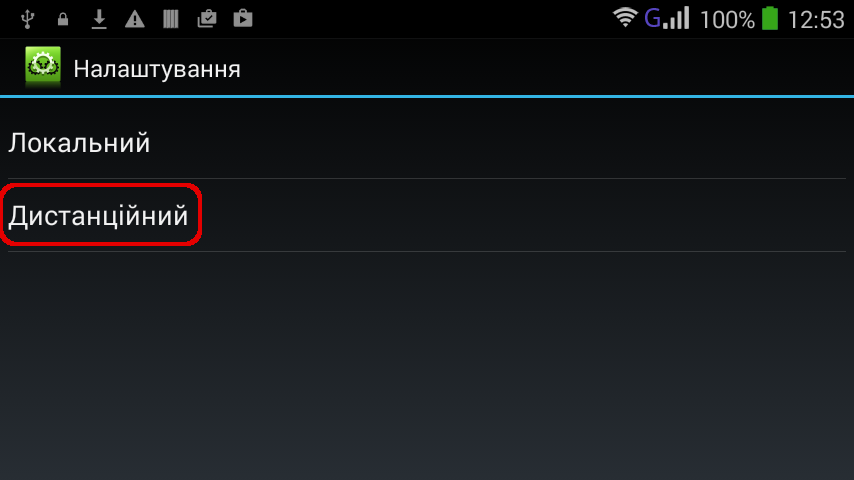
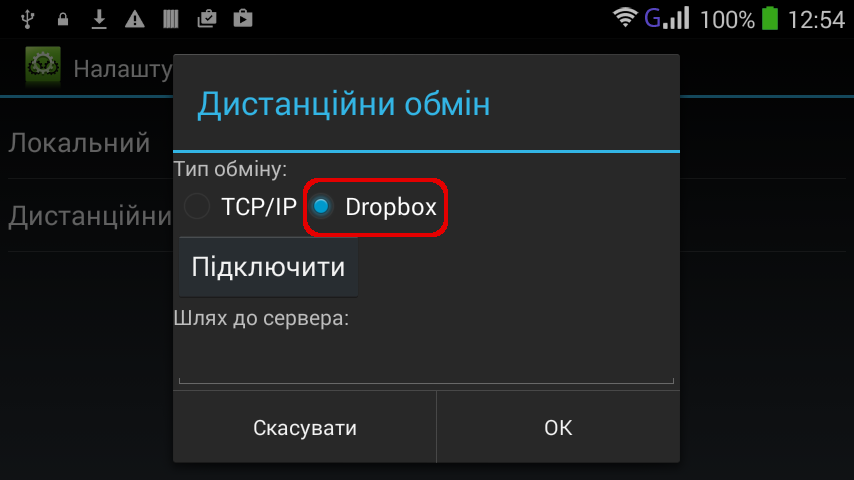
- Launch «PalmOrder». Tap «Settings», choose «Exchange menu» — «Remote».
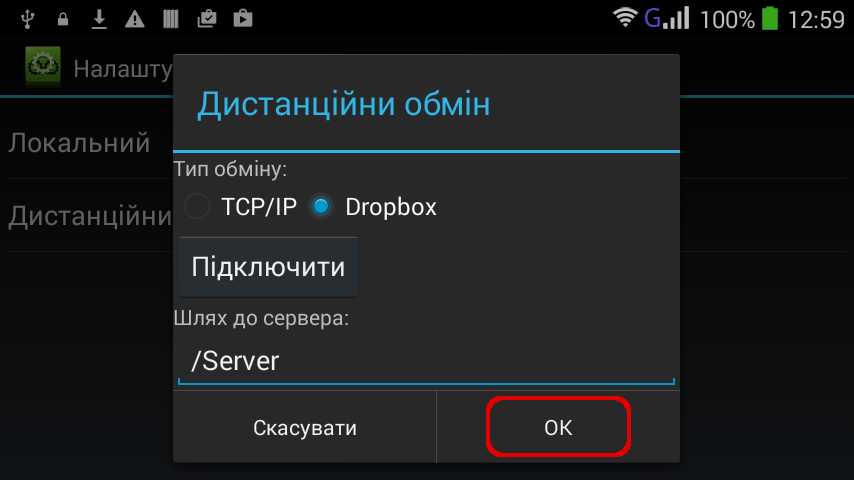
- Select Dropbox.
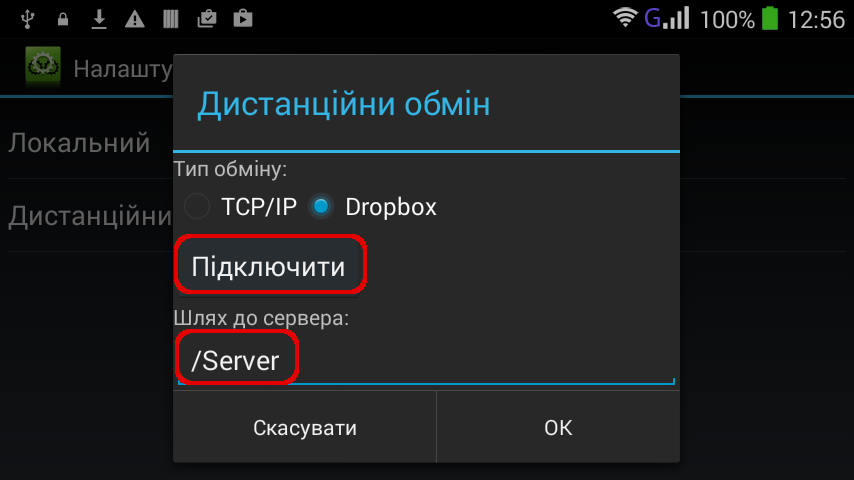
- Enter /Server in the window «Path to server»
- Tap «Connect» («Reconnect», if you had connected earlier on the device).
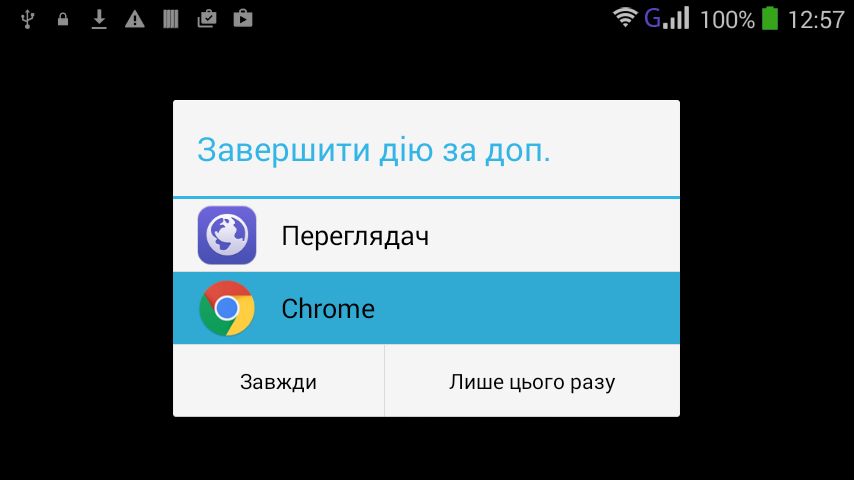
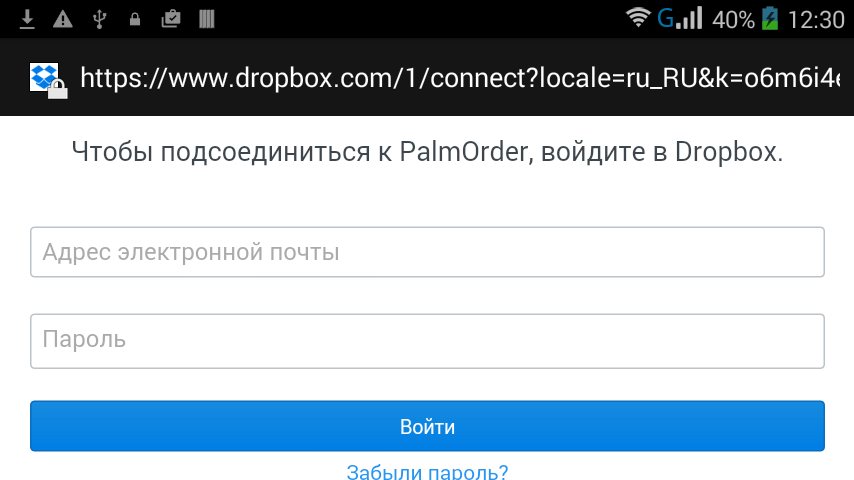
- If «Complete action using» window appears, chose what you prefer — as for me, I use Browser. The window of connection to Dropbox appears. Enter the e-mail address and password that you use on Dropbox for this device. Tap «Sign in».
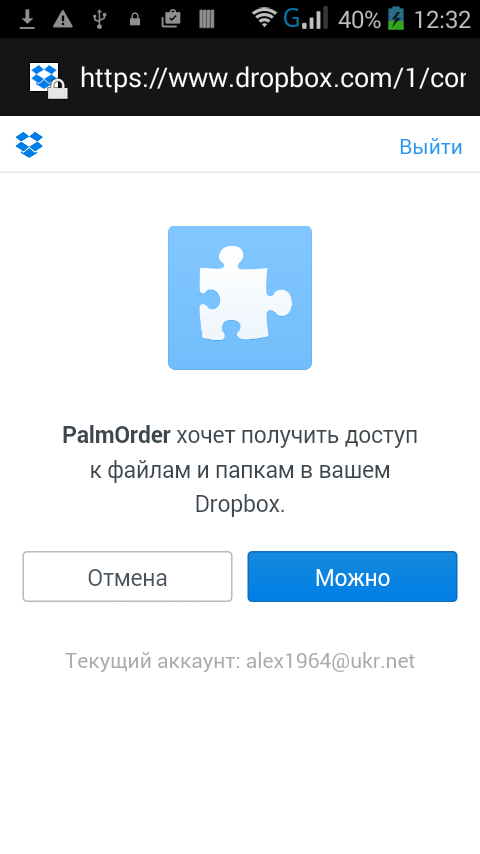
- Allow to access Dropbox shared folders by PalmOrder: tap «Can».
- Tap «OK» to complete configuring
Now it's done.
Now no need to start palm_server.exe to perform remote exchange. But if you need to perform local exchange, it's necessary to start palm_serv.exe. Make sure you start c:\Dropbox\Server\palm_server.exe, but not c:\PalmOrder\Server\palm_serv.exe. You better delete c:\PalmOrder\Server\palm_serv.exe to be sure. Nota bene, that to install license on a mobile device you need to perform only Local exchange. So don't forget to start c:\Dropbox\Server\palm_server.exe. Don't forget to exit palm_server.exe after license is installed (or other local exchange is performed). When palm_server.exe executes locally for installing new licenses on mobile devices, exchange via Dropbox does not operate.
05How to change the administrator password?#+
The administrator password is stored in the gl_settings table, record code ADMIN_USER_PASS. Password is in the field «value». If the record with this code doesn't exist, use the default password admin.
It is possible to update the gl_settings table on Android device using exchange. Don't forget to add the gl_settings table to an exchange configuration file, e.g. exchange.xml, the «Download data» section. After that download updated exchange.xml to the mobile device.
The example of generating XML to create the gl_settings table. To convert an XML-format into a db-format, use the xml2ElDb.exe gl_settings.xml command.
06How to install the license?#+
Configuer the exchange settings as described in the point 2 on this page
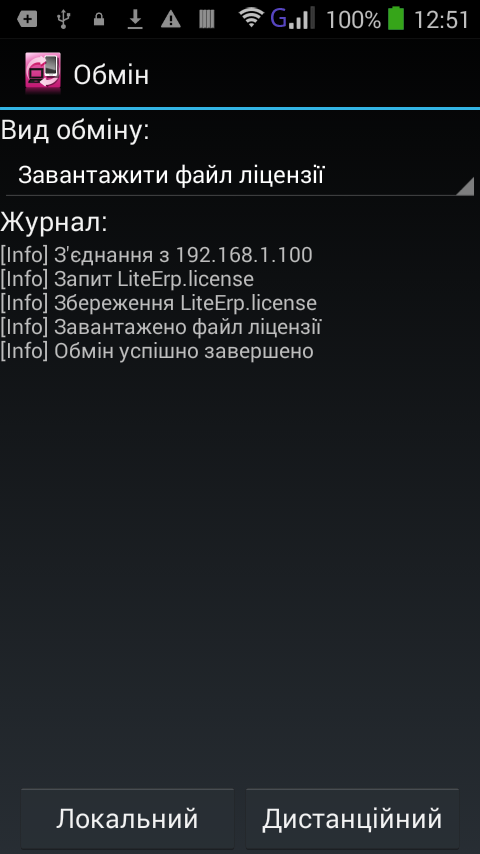
- Copy the license file to a server folder for outgoing messages. Usually it is called Outbox.
- Start «PalmOrder» on your mobile device.
- Choose «Exchange».
- In the dropdown list «Type of exchange» select «Download license file».
- Perform exchange.
- Delete the file LiteERP.license from the Outbox folder on the server (usually it is called Outbox).
07What is the time format?#+
The time on your device is stored and transferred to a server as the number of milliseconds starting from 01.01.1970, 00:00 UTC.
08How do I set a special price for a product for a specific customer?#+
You can set an item individual price for a specific customer (customers). To do this, you need to create the file customer_product_data.xml with the fields customer_code, product_code, price. Here is the example of the file customer_product_data.xml for a customer with code 4 and an item with code 12:
<?xml version="1.0" encoding="windows-1251"?>
<table name="customer_product_data">
  <schema>
    <field name="customer_code" type="TEXT KEY" />
    <field name="product_code" type="TEXT KEY" />
    <field name="price" type="REAL" />
  </schema>
  <data>
    <record>
      <f>4</f>
      <f>12</f>
      <f>17.50</f>
    </record>
  </data>
</table>
The table for selecting items in the «Request» document will look like this:
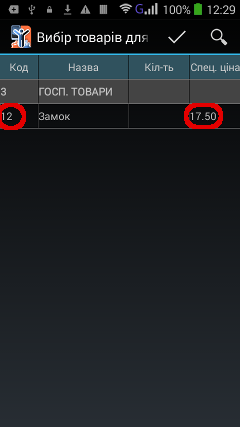
The individual price now has the highest priority over any other category of prices established for this customer. You can change it by selecting another category of prices in a document «Details», or manually tapping «Price» in the Quantity dialog box. To return an individual price, you can either delete the record from a document, or set its quantity as 0, and then enter a desired quantity again.
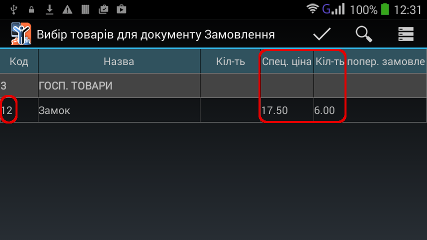
The same way you can add any field containing any item individual parameter for any customer. For example, if you want the information on the quantity of goods from a customer's previous «Request», your file customer_product_data.xml should look like this:
<?xml version="1.0" encoding="windows-1251"?>
<table name="customer_product_data">
<schema>
	<field name="customer_code" type="TEXT KEY" />
	<field name="product_code" type="TEXT KEY" />
	<field name="price" type="REAL" />
	<field name="preorder_count" type="REAL" />
</schema>
<data>
<record>
	<f>4</f>
	<f>12</f>
	<f>17.50</f>
	<f>6</f>
</record>
</data>
</table>
This is the result on your screen.
09How do I choose a light or dark theme?#+
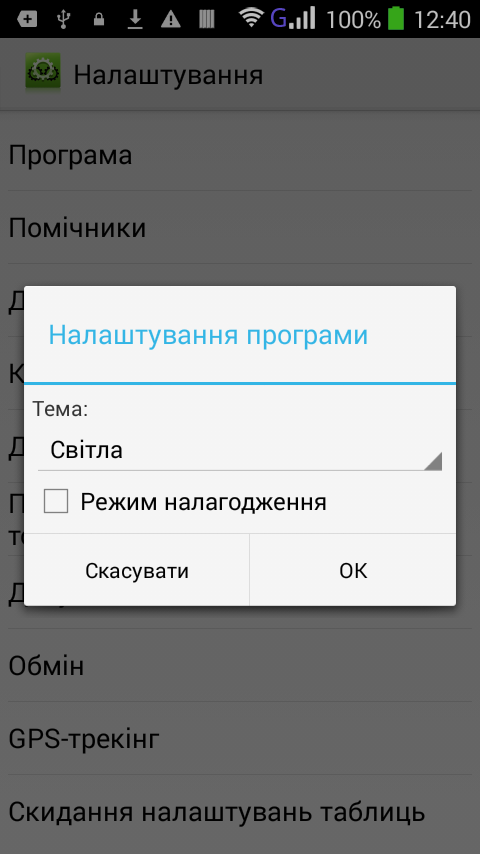
Starting from version 1.1.5, «PalmOrder: Pre-Selling» supports standard Android themes Holo Light and Holo Dark. To select any of them:
- choose «Settings» — «Application»;
- choose a desired option in the drop-down list of themes;
- tap «OK».
10How do I prevent orders from customers with overdue debt?#+
If you want to deny creation of «Request» documents for customers that have an overdue debt, follow these steps:
- Tap «Settings», choose «Request document», enter password (admin by default).
- Enable «Deny creation for customers with overdue debt», tap «OK».
- Choose «Payment document», enter password (admin by default).
- Enable «Forbid to edit saved documents» and/or «Forbid to delete unsent documents», tap «OK».
The overdue debts are stored in the «Customers» reference (field expired_debt). Values of debts are downloaded from AIS (ERP).
11How do I require a photo when creating an order?#+
How to set an obligatory photograph?
This feature is available for customers that use Full license
To set an obligatory photograph, you need to add the line <field name="photo_required" type="INTEGER" /> to your file ref_customers.xml when it is creating. If the field value is 0 or empty, a photo is not required, in all other cases it's obligatory.
If a photo required mode is activated, then your mobile employee will receive a message to take a photo. He won't be able to set a desired quantity of items before the photo is saved. For this he needs to:
- (while he is in the «Details» or «Items» tabs) call «Menu», choose «Photo»;
- take a photo and save it;
- continue working.
Photos will be sent to server when you send documents.
12How to take a photo and send it to server?#+
How to take a photo and send it to server?
This feature is available for customers that use Full license
To take a photo, you need:
- while you are in the «Request» document («Details» or «Items» tabs), call «Menu», choose «Photo»;
- take a photo and save it;
- continue working.
Photos will be sent to server when you send documents.
13How to show an item image in Details?#+
To show an item image in Details, you need to:
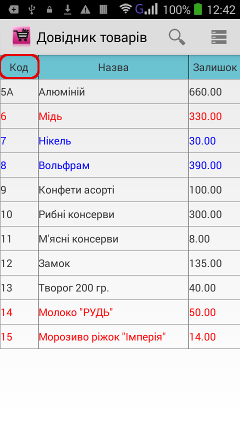
- the name of an image file must match an item reference code. If an item code is 5A, the name of an image file should also be 5A.extension;
- make sure that a file extension is supported by «PalmOrder: Pre-Selling» (jpg, gif, png, bmp). If you have another format, you'll need to convert your files. We also advise to use files of the same format. For example, you have a file 15.jpg. If you want to update it, and upload file 15.png, «PalmOrder: Pre-Selling» will view them as two separate files and display 15.jpg in «Details». But if you upload a file of the same format and name, a new file will replace an older one, and a new image will be displayed;
- place prepared images into [path_to_server]\Outbox\Images on your server.
- Important: if you have a lot of images, we recommend to limit a picture size to 50 kB. The download speed of such files is 80-100 files per minute. The bigger the size, the longer the download.
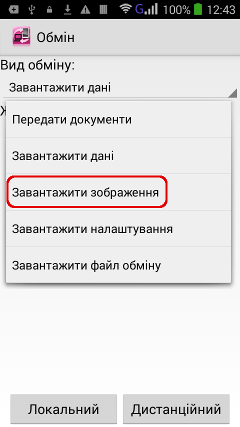
Start PalmOrder on your PDA. Tap «Exchange», in a drop-down list select «Download images». Tap «Local» to perform exchange via Wi-Fi. We don't recommend using the «Remote» exchange, because the transfer speed via Internet is much lower than via Wi-Fi. You definitely won't like waiting for the download for tens of minutes or even hours.
Enter Items reference. Tap and hold any record. Choose «Image» in menu appeared.
14How to change preferences remotely?#+
Create the file preferences.xml (its structure is described in the Administrator's Guide, chapter «Configuring Exchange», paragraph «The File of Remote Preferences for the Mobile Part»), and place it into an outgoing folder (usually it is C:\PalmOrder\Server\Outbox).
The installation package of the server part contains the examples of the files preferences.xml and exchange.xml. Keep in mind, that you can place the procedure of downloading preferences.xml remotely into any existing exchange mode. No need to create an individual exchange mode. The structure of the file exchange.xml is described in the Administrator's Guide, chapter «Configuring Exchange», paragraph «Exchange File».
15Can I print documents?#+
This feature is available for customers that use Full license
«PalmOrder: Pre-Selling» allows you to print documents using the created print forms. Print settings include:
<print-forms>
  <document name="order">
    <forms>
      <form>
        <presentation>Invoice</presentation>
        <file>invoice.prn</file>
      </form>
      <form>
        <presentation>Delivery Note</presentation>
        <file>delivery_note.prn</file>
      </form>
    </forms>
  </document>
  <document name="payment">
    <forms>
      <form>
        <presentation>Ticket</presentation>
        <file>ticket.prn</file>
      </form>
    </forms>
  </document>
</print-forms>
{% escp.esc 2 %}{% escp.12 %}
Supplier: {$we.company} Address: {$we.address}
Reg. №: {$we.registration}
Payment details: {$we.billing}
Receiver: {$doc.customer.full_name}
Address: {$doc.customer.Address}
{% escp.esc E %}DELIVERY NOTE № {$doc.number} from
{$doc.date}{% escp.esc F %}
{% escp.esc 0 %}
+----------------------------------------------------------------------------+
| № | Items | Meas | Units | Per unit | Sum |
+----------------------------------------------------------------------------+
{% loop in $products as $product counter=$num %}
| {$num|qcalc(+1)|sprintf(%-4s)}| {$product.name|left(25)|sprintf(%-25s)}|
{$product.measure_unit|left(4)|sprintf(%4s)} | {$product.count|sprintf(%8.2f)}|
{$product.price|sprintf(%11.2f)} | {$product.sum|sprintf(%12.2f)}|
{% endloop %}
+----------------------------------------------------------------------------+
{% escp.esc 2 %}
Total $: {$doc.sum|sprintf(%.2f)}.
{% escp.0C %}<exchange name="print_forms" view="Download print forms">
<get>
<files>
<file name="print_forms_xml" files="print_forms.xml" />
<file name="print_forms_prn" files="*.prn" />
</files>
</get>
</exchange>- creating a print form file
- creating print forms
- downloading a print form file and *.prn-print forms
- linking printer and editing the printing requisites
- All we have left is to enter printing requisites and select a printer. To set the printing requisites, tap «Settings», choose «Print» — «Print Entries». Fill in the fields you will use for printing. Tap «OK». To create a link, make sure that your printer is turned on, and BlueTooth is activated on both devices. Enter your PDA «Settings», tap «BlueTooth», then «Search for devices». Select a corresponding printer, and enter a required PIN to pair the devices (usually it is 0000 or 1234). Now tap «Settings» in the PalmOrder main window. Choose «Print» — «Printer». Select a desired printer in the «Print device» field (if a printer is not on the list, it is either turned off, or a BlueTooth adaptor doesn't work). Enter a code page in a corresponding field (for example, it can be CP866 or CP1251 for Cyrillic symbols — see the printer manual). If printing suddenly cuts off, enter a delay canceling value in a corresponding field. The longer the document, the larger the value. You'll need to determine the value empirically, but start with 500 milliseconds. Tap «ОК» when finished. Now everything is ready. To print a document, you need to open it, choose «Menu» — «Print», select a desired print form (if there are several). Printing will start in 500 milliseconds immediately.
16How to highlight a reference element with some other color?#+
Colors of reference elements are set in the reference column «color». Value must be set in a hexadecimal format 0xRRGGBB, e.g. 0x00FF00 corresponds to green. Here you can find color examples, as well as links to other resources, containing similar tables. Reserved values (1 – red, 2 – green, 3 – blue) can be presented in a decimal format. The example of ref_products.xml.
GPS tracking+
01How can I know the GPS-coordinates of a created document?#+
This feature is available for customers that use Full license
There are two ways:
- You can view a detailed route and the saving points of «Request» documents on the GPS-tracking server.
- The coordinates are also saved in the fields «Latitude» and «Longitude» of a «Request» document, if accuracy of the resulting point is less than 50 m, and its age is less than 10 minutes. You can also use these coordinates to create a customer coordinates database.
02How to set up GPS-tracking?#+
This feature is available for customers that use Full license
Start «PalmOrder: Pre-Selling» on your device and:
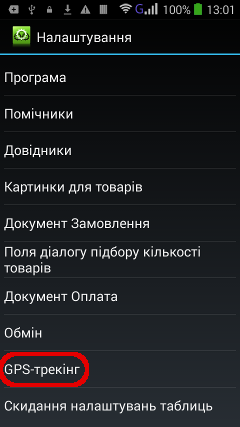
- Choose Settings — GPS-tracking (password by default is admin).
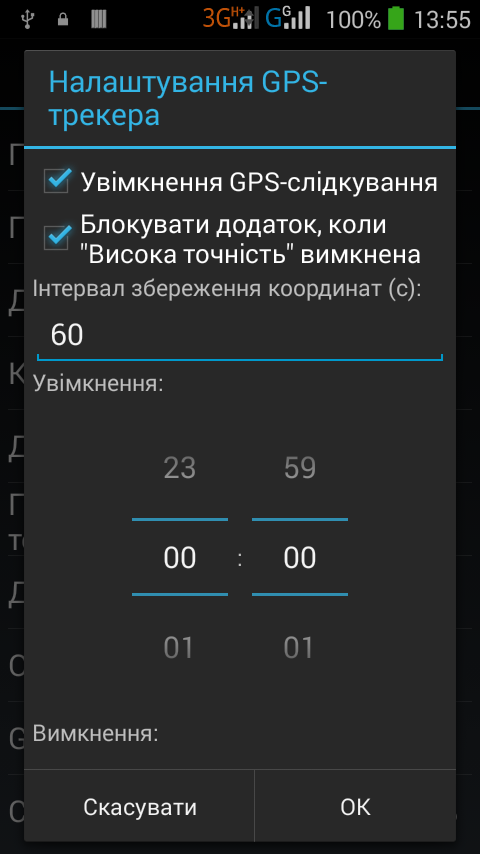
- Tick off the box «Enable GPS-tracking». If you need GPS to operate in High accuracy mode only, enable the option «Block application when High accuracy is off».
- Set the interval of coordinates saving (in seconds). Value by default is 60 seconds. Keep in mind, that Android versions lower than 4.3. ignore this parameter and attempt to get coordinates every second. Thus, we have set the condition of getting new coordinates only if a PDA location changes for more than 5 meters.
- Set the initial and ending time of feature activity. If start time = stop time, the feature will operate permanently.
- Tick off the box «Send points to GPS-server», fill in the fields of «Login» and «Password» with values you received when registering on gps.palmorder.com.
- Set the interval of coordinates sending (in seconds). Use the principle: the weaker the battery, the longer the interval. Value by default is 60 seconds.
- Set the period of checking a GPS module operation. This option is necessary because the operating system can suspend the service (for example, in case of insufficient memory). In this case the service will be re-launched, and the saved coordinates will be transferred to a server. A period is set in minutes. Value by default is 60 minutes.
- Tap «ОК».
Make sure that a GPS module operates, and option «Enable GPS-tracking» is activated. The Android security policy does not allow enabling/disabling a GPS module with application tools. A PDA owner controls this feature via «Settings». Thus a mobile employee can disable a GPS module any time. In such case we can only limit the scope of work with PalmOrder. For example, to block the application untill High accuracy GPS mode is off.